Deploying Containerized Applications with AKS Made Easy
A step-by-step guide for starting with Azure Container Service (AKS) and deploying a containerized application using Kubernetes.
Today it's pretty common to run containerized applications. You first start with 1 application and a couple of services. In times your applications grow and more services are joining your landscape. Before you know it, you have a lot of (micro)services running for you. But in time the organization around these services is beginning to get quite messy and a few moments later you realize maybe we need to use a framework/service like Kubernetes. But setting that up is a horrible time-consuming job. That is where AKS (Azure Kubernetes Service) might come in handy ;-)
In this tutorial, I will demonstrate how easily you can start using Kubernetes in Azure.
If you're totally new to Kubernetes, I suggest you check out these videos from Techworld with Nana. Microsoft has made a lot of things easy with AKS but I still recommend you take a look, because it's important that you know how it works.

I assume you have Azure CLI installed. If not, you can find it here.
And I assume your having no difficulties using Docker.
To start first open a terminal window and login to your Azure environment.
az login
After your login is successful, start by creating your resource group
az group create -l westeurope -n myResourceGroup
When the resource group is created you can start with the following command to create a default Azure Kubernetes Service (AKS).
az aks create -g myResourceGroup -n myAKSCluster --enable-managed-identity --node-count 1 --generate-ssh-keys
Now wait a couple of minutes for Azure to set up your AKS cluster.
For this example, we only have 1 node. (see command) You can change the number of nodes that are needed according to your own specifications. These are the default Linux Nodes, that are generated and only support Linux containers. If you want to be able to run Windows containers, you have to set up a Windows node.
You also have the possibility to directly enable LogAnalystics on your cluster, but please be careful with that. The logging of AKS is quite extensive. I have examples of customers that have hundreds of GB with Kubernetes logging which is costing them thousands of dollars because it's easily forgotten and not cleaned up.
After a while, the cluster is successfully created.
Kubectl
We're gonna set up the kubectl, also called, Kubernetes command line tool. We can use this tool to communicate with our new AKS cluster. You can find it here.
You can also use the following command to install kubectl through the Azure CLI.
az aks install-cli
Once you are done installing kubectl, it's time to connect to the AKS cluster which we just created.
Once you have correctly installed the kubectl we setup kubectl to contact our newly created cluster with the following command:
az aks get-credentials --resource-group myResourceGroup --name myAKSCluster
This command will make sure that the credentials, to connect to our AKS, are stored and used for the kubectl.
Azure Container Registry (ACR)
Next, we are gonna create an Azure Container Registry (ACR), which we are gonna use to store our container images. We also need to ACR to store our own created images based on our containers.
In order to set up our ACR when using the following cli command.
az acr create -n myAcr -g myResourceGroup --sku basic
This command will set up an ACR service for us. After that, we need to let Azure know that we are gonna use this ACR to feed our AKS cluster. So we need to attach the ACR to our cluster like so:
az aks update -n myAKSCluster -g myResourceGroup --attach-acr myAcrContainerize your application and upload it to ACR
We will create a simple docker file that will containerize our simple .Net WebApi. For this example, I used a standard dockerfile from Visual Studio.
FROM mcr.microsoft.com/dotnet/sdk:6.0 AS build-env
WORKDIR /App

# Copy everything
COPY . ./
# Restore as distinct layers
RUN dotnet restore
# Build and publish a release
RUN dotnet publish -c Release -o out

# Build runtime image
FROM mcr.microsoft.com/dotnet/aspnet:6.0
WORKDIR /App
COPY --from=build-env /App/out .
EXPOSE 80:80
ENTRYPOINT ["dotnet", "webapi.dll"]
If a docker image is successfully created we are gonna upload this image to our recently completed ACR with the following command
#login with azure cli
az login

#use the az acr command to login to you ACR
az acr login --name myAcr

#now tag our created image with docker and push it to our ACR
docker tag webapi myAcr.azurecr.io/webapi
docker push myAcr.azurecr.io/webapi
Run your webapi inside Azure Container Service
In order to start up our uploaded webapi image inside AKS, we need to define a deployment yaml file. For our service, I have defined the following. You can find the full specs of the deployment template right here
apiVersion: apps/v1
kind: Deployment
metadata:
  name: webapi-deployment
  labels:
    app: webapi
spec:
  replicas: 1
  selector:
    matchLabels:
      app: webapi
  template:
    metadata:
      labels:
        app: webapi
    spec:
      containers:
      - name: webapi
        image: myAcr.azurecr.io/webapi:5
        ports:
        - containerPort: 80
Let's open up a terminal again and instruct AKS to start our WebApi container, with the image from the ACR. In order to execute this, save the file locally as deployment.yaml
#login to azure
az login

#connect to the AKS cluster
az aks get-credentials --resource-group myResourceGroup --name myAKSCluster

#check to see if kubectl have the right cluster selected
kubectl config get-contexts

#instruct kubectl to execute the deployment.yaml file on the selected #cluster
kubectl apply -f deployment.yaml
Now AKS will startup the image which resides in the ACR. Once it's running you will see that it is running inside the Azure Portal.
Navigate to your AKS cluster and check your workloads.
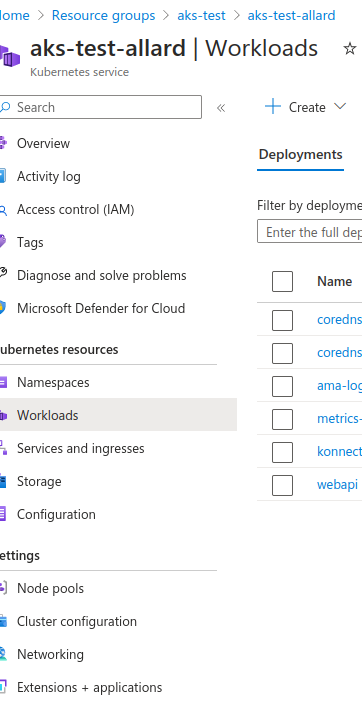
If all went well you will see your webapi running under the default namespace.

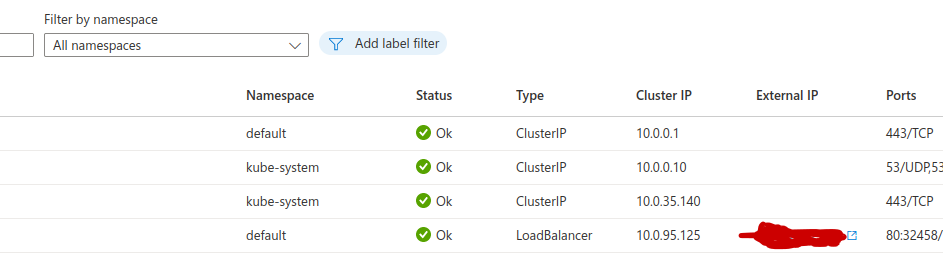
The webapi might be running inside your cluster, but by default it's not exposed yet to the outside world. For that, we need a Kubernetes service called "Loadbalancer". Normally you could use a different type of Service, but since we are running on a cloud provider, it's recommended to use the load balancer service.
In order to configure a Loadbalancer Service we need a template like the one below
apiVersion: v1
kind: Service
metadata:
  name: webapi
spec:
  type: LoadBalancer
  ports:
  - port: 80
  selector:
app: webapi-deploymentNow apply the loadbalancer configuration to your AKS cluster
kubectl apply -f loadbalancer.yaml And you're done. Now your webapi should be accessible to the outside world. In order to see your result navigate to the menu item "Services and Ingresses". You will see your LoadBalancer type appearing with an external IP address. You can use that address to access your API.
You can find the source files here
References


Comments ()